Blinkies


Email Me
ladyaries_67@yahoo.com


Creative Teams
♥Proud Personal CT♥


Forums


I Support...

Showing posts with label CT - Devilish Dezines. Show all posts
Showing posts with label CT - Devilish Dezines. Show all posts
Thursday, March 19, 2015
Lady Heart - PTU


Monday, March 9, 2015
Lucky - PTU


*Click tag to view full size*
This tutorial is from my own imagination,
any similarity to any other tag or tutorial is purely coincidental.
It was written by LadyAries on March 9, 2015.
This tut was written for those with a basic knowledge of psp.
*Supplies Needed*
PSP: I am using X2 but any version should work.
Font of choice: Callie Hand
PlugIns: Eye Candy 6, Gradient glow for the name..
*Scrap kit Of Choice*
I am using the fantastic PTU kit "Bicycle" by Devilish Dezines.
And it can be purchased from Scraps N Company.
*Tube of Choice*
I am using the beautiful art of Alicia Mujica.
And it can be purchased from Alicia Mujica Design.
This is a PTU tube and you must have a license to use.
~ ~ ~ ~ ~ ~ ~ ~ ~ ~
*Let's Get Started*
*Remember to add your drop shadow as you go along*
I am using V3 H3 O25 B5 black.
Open a new image 851 x 315 for banner.
C&P paper 6 into your tag.
Element 24 resize 50 %, C&P to the left side of your tag. Duplicate & mirror.
Element 34, C&P to the left side of your tag. Duplicate & mirror.
Element 22 resize 50%, C&P to the right side of your tag. Duplicate & mirror.
Element 7 resize 35%, C&P to the right side of your tag. Duplicate & mirror.
Element 48, C&P to the center of your tag.
Element 13 resize 22%, C&P to the right side of your tag. Duplicate & mirror.
Element 13 resize 18%-mirror, C&P to the left side of your tag. Duplicate & mirror.
Element 8 resize 14%, C&P to the right side of your tag. Duplicate & mirror.
Resize tube 60%, C&P to the center of your tag.
See my tag for details.
Add more elements if you wish to.
Merge visible, Selections, Select All, Modify, Select Selections Borders with these settings:
This tutorial is from my own imagination,
any similarity to any other tag or tutorial is purely coincidental.
It was written by LadyAries on March 9, 2015.
This tut was written for those with a basic knowledge of psp.
*Supplies Needed*
PSP: I am using X2 but any version should work.
Font of choice: Callie Hand
PlugIns: Eye Candy 6, Gradient glow for the name..
*Scrap kit Of Choice*
I am using the fantastic PTU kit "Bicycle" by Devilish Dezines.
And it can be purchased from Scraps N Company.
*Tube of Choice*
I am using the beautiful art of Alicia Mujica.
And it can be purchased from Alicia Mujica Design.
This is a PTU tube and you must have a license to use.
~ ~ ~ ~ ~ ~ ~ ~ ~ ~
*Let's Get Started*
*Remember to add your drop shadow as you go along*
I am using V3 H3 O25 B5 black.
Open a new image 851 x 315 for banner.
C&P paper 6 into your tag.
Element 24 resize 50 %, C&P to the left side of your tag. Duplicate & mirror.
Element 34, C&P to the left side of your tag. Duplicate & mirror.
Element 22 resize 50%, C&P to the right side of your tag. Duplicate & mirror.
Element 7 resize 35%, C&P to the right side of your tag. Duplicate & mirror.
Element 48, C&P to the center of your tag.
Element 13 resize 22%, C&P to the right side of your tag. Duplicate & mirror.
Element 13 resize 18%-mirror, C&P to the left side of your tag. Duplicate & mirror.
Element 8 resize 14%, C&P to the right side of your tag. Duplicate & mirror.
Resize tube 60%, C&P to the center of your tag.
See my tag for details.
Add more elements if you wish to.
Merge visible, Selections, Select All, Modify, Select Selections Borders with these settings:

Now over in your layers palette set your foreground to #6b8546.
Do not deselect yet. Now flood fill your border. Click on Adjust, Add/remove noise, Add noise with these settings.
Do not deselect yet. Now flood fill your border. Click on Adjust, Add/remove noise, Add noise with these settings.
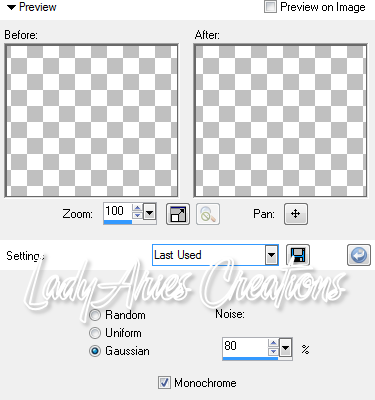
Selections, select none.
Apply the correct artist copyright and license info and save as a PNG, then add your name and merge & save.
(NOTE: FB does not allow URL's on banners - so only add copyright and license info)
***
Now for the avatar.
Open a new image 180 x 180
C&P the banner into your tag, slide it around so that the bottom right corner is showing.
Resize tube 40%, C&P to the left side of your tag.
Now slide your background around to where you have it the way you want it.
Merge visible and repeat steps from above for your boarder, gradient & noise.
If you add the tube be sure to apply the correct artist copyright and license info and save as a PNG.
Now add your name and merge & save.
See my tag for details.
Add more elements if you wish to.
When you are happy with your tag merge all layers.
I hope you enjoyed this tut. ♥


Monday, February 16, 2015
Heartbreaker - PTU


*Click tag to view full size*
This tutorial is from my own imagination,
any similarity to any other tag or tutorial is purely coincidental.
It was written by LadyAries on February 16th, 2015.
This tut was written for those with a basic knowledge of psp.
*Supplies Needed*
PSP: I am using X2 but any version should work.
Font of choice: I am using Yesterday Again
PlugIns: Eye Candy 6, Gradient glow for the name.
*Scrap kit Of Choice*
I am using the fantastic PTU kit " Heartbreaker" by Devilish Dezines.
And it can be purchased from Scraps N Company
*Tube of Choice*
I am using the beautiful art of Arthur Crowe.
And it can be purchased from Arthur Crowes Factory.
This is a PTU tube and you must have a license to use.
Inner Bevel on the name with these settings:

~ ~ ~ ~ ~ ~ ~ ~ ~ ~
*Let's Get Started*
*Remember to add your drop shadow as you go along*
I am using V3 H3 O25 B5 black
Open a new image 851 x 315 for banner.
Copy & paste paper4 into your tag.
Element28 resize 45 percent-mirror, copy & paste to the left side of your tag.
Element5 resize 55 percent, copy & paste to the left side of your tag.
Element7 resize 50 percent, copy & paste to the left side of your tag.
Element11 resize60 percent, copy & paste to the center of your tag.
Element49 resize 25 percent, copy & paste to the left side of your tag.
Element50 resize 35 percent, copy & paste to the left side of your tag.
Element24 resize 20 percent, copy & paste to the left side of your tag.
Element21 resize 10 percent, copy & paste to the left side of your tag.
I have used the close up 2 tube resize 90 percent, copy & paste to the right side of your tag.
See my tag for details.
Add more elements if you wish to.
Merge visible, Selections, Select All, Modify, Select Selections Borders with these settings

Do not deselect yet. Now flood fill your border with a color of choice, I have used #5f4164. Click on Adjust, Add/remove noise, Add noise with these settings.

Selections, select none.
Apply the correct artist copyright and license info and save as a PNG, then add your name and merge & save.
(NOTE: FB does not allow URL's on banners - so only add copyright and license info)
***
Now for the avatar.
Open a new image 180 x 180
Copy & paste the banner into your tag, slide it around so that the bottom left corner is showing.
Merge visible and repeat steps from above for your boarder & noise.
If you add the tube be sure to apply the correct artist copyright and license info and save as a PNG.
Now add your name and merge & save.
See my tag for details.
When you are happy with your tag merge all layers.
I hope you enjoyed this tut. ♥


Thursday, February 12, 2015
Fire Queen - PTU


*Click tag to view full size*
This tutorial is from my own imagination,
any similarity to any other tag or tutorial is purely coincidental.
It was written by LadyAries on February 12th, 2015.
This tut was written for those with a basic knowledge of psp.
*Supplies Needed*
PSP: I am using X2 but any version should work.
Font of choice: I am using A&S Signwriter
PlugIns: Eye Candy 6, Gradient glow for the name.
*Scrap kit Of Choice*
I am using the fantastic PTU kit "Butterfly Fire" by Devilish Dezines.
And it can be purchased from Scraps N Company
*Tube of Choice*
I am using the beautiful art of Alex Prihodko.
And it can be purchased from Pics For Design.
This is a PTU tube and you must have a license to use.
~ ~ ~ ~ ~ ~ ~ ~ ~ ~
*Let's Get Started*
*Remember to add your drop shadow as you go along*
I am using V3 H3 O25 B5 black
Open a new image 851 x 315 for banner.
Copy & paste paper2 into your tag.
Element8 resize 80 percent-mirror, copy & paste to the left side of your tag.
Element10 resize 80 percent, copy & paste to the left side of your tag.
Resize tube 70 percent-mirror, copy & paste to the center of your tag.
Element3 copy & paste to the right side of your tag.
Element6 copy & paste to the bottom center of your tag.
Element3 - mirror, copy & paste to the left side of your tag.
See my tag for details.
Add more elements if you wish to.
Merge visible, Selections, Select All, Modify, Select Selections Borders with these settings

Now over in your layers palette set your foreground to #521515 and your background to #c06262 and set up your gradient with these settings.

Do not deselect yet. Now flood fill your border with your gradient. Click on Adjust, Add/remove noise, Add noise with these settings.

Selections, select none.
Apply the correct artist copyright and license info and save as a PNG, then add your name and merge & save.
(NOTE: FB does not allow URL's on banners - so only add copyright and license info)
***
Now for the avatar.
Open a new image 180 x 180
Copy & paste the banner into your tag, slide it around so that the bottom left corner is showing.
Merge visible and repeat steps from above for your boarder, gradient & noise.
If you add the tube be sure to apply the correct artist copyright and license info and save as a PNG.
Now add your name and merge & save.
See my tag for details.
Add more elements if you wish to.
When you are happy with your tag merge all layers.
I hope you enjoyed this tut. ♥


Thursday, January 15, 2015
New Years Wish - PTU

*Click tag to view full size*
This tutorial is from my own imagination,
any similarity to any other tag or tutorial is purely coincidental.
It was written by LadyAries on January 15th, 2015.
This tut was written for those with a basic knowledge of psp.
*Supplies Needed*
PSP: I am using X2 but any version should work.
Font of choice: I am using Happy New One
PlugIns: Eye Candy 6, Gradient glow for the name.
*Scrap kit Of Choice*
I am using the fantastic PTU kit "New Year Fairy" by Devilish Dezines.
And it can be purchased from Scraps N Company
*Tube of Choice*
I am using the beautiful art of The Hunter.
And it can be purchased from Scraps N Company
This is a PTU tube and you must have a license to use.
~ ~ ~ ~ ~ ~ ~ ~ ~ ~
*Let's Get Started*
*Remember to add your drop shadow as you go along*
I am using V3 H3 O25 B5 black
Open a new image 650 x 650
Element9 resize 90 percent, copy & paste to the center of your tag. Adjust, Sharpness, sharpen one time. Duplicate & mirror.
Frame3 resize 74 percent, copy & paste to the center of your tag.
Activate your magic wand and click inside your frame layer, Selections modify expand by 6.
Copy & paste Paper6, Selections, invert and then click delete. Over in your layers palette drag this layer under your frame.
Resize tube to your liking and copy & paste under your frame layer. Use your eraser tool to remove the excess parts that are hanging out of your frame.
Frame2 resize 78 percent, copy & paste to the center of your tag. Do not drop shadow this layer. Adjust, Sharpness, sharpen one time.
Activate your magic wand and click inside your frame layer, Selections modify expand by 6.
Copy & paste Paper6, Selections, invert and then click delete. Over in your layers palette drag this layer under your frame.
Resize tube to your liking and copy & paste under your frame layer. Use your eraser tool to remove the excess parts that are hanging out of your frame.
Frame2 resize 78 percent, copy & paste to the center of your tag. Do not drop shadow this layer. Adjust, Sharpness, sharpen one time.
Element13 resize 38 percent, copy & paste to the bottom of your tag. Add your drop shadow, Adjust, Sharpness, sharpen one time. Duplicate twice.
Element38 resize 40 percent, copy & paste to the right side of your tag. Adjust, Sharpness, sharpen one time.
Element24 resize 48 percent, copy & paste to the right side of your tag.
Element50 resize 20 percent, copy & paste to the right side of your tag.
Element28 resize 22 percent, copy & paste to the right side of your tag.
Element24 resize 48 percent, copy & paste to the right side of your tag.
Element50 resize 20 percent, copy & paste to the right side of your tag.
Element28 resize 22 percent, copy & paste to the right side of your tag.
Element43 resize 23 percent, copy & paste to the right side of your tag.
Element16 resize 20 percent, copy & paste to the right side of your tag.
See my tag for details.
See my tag for details.
Add more elements if you wish to.
When you are happy with your tag merge all layers and resize to your liking.
When you are happy with your tag merge all layers and resize to your liking.
Apply the correct artist copyright and license info and save as a PNG, then add your name and merge & save.
I hope you enjoyed this tut. ♥

Friday, January 9, 2015
Sexy And I Know It - PTU

*Click tag to view full size*
This tutorial is from my own imagination,
any similarity to any other tag or tutorial is purely coincidental.
This tutorial was written by LadyAries on January 9th, 2015.
This tut was written for those with a basic knowledge of psp.
*Supplies Needed*
PSP: I am using X2 but any version should work.
Font of choice: I am using Vivaldi
Mask: HorsePlay's Pasture Mask2 HERE
Template: Millie's PSP Madness 647 HERE
PlugIn: Eye Candy 6, Gradient glow for the name.
*Scrap kit Of Choice*
I am using the beautiful PTU kit "Elegant Party" by Devilish Dezines.
And it can be purchased from Scraps N Company
*Tube of Choice*
I am using the beautiful art of Jose Cano.
You can purchase his artwork from his store Cano Tubes.
However this tube is no long available.
This was a PTU tube and you must have a license to use.
~ ~ ~ ~ ~ ~ ~ ~ ~ ~
*Let's Get Started*
*Remember to add your drop shadow as you go along*
I am using V3 H3 O25 B5 black
Open template, Shift D to duplicate then close original & delete credits.
1
Select all/float/defloat new raster layer. Open paper3 and copy & paste into selection, selection invert, delete, select none & delete original template layer.
2
Select all/float/defloat new raster layer open paper6 and copy & paste into selection, selection invert, delete, select none & delete original template layer.
3
Delete this layer
4
Select all/float/defloat new raster layer open paper4 and copy & paste into selection, selection invert, delete, select none & delete original template layer.
5
Select all/float/defloat new raster layer open paper5 and copy & paste into selection, move it around to where you have it where you want it and then selection invert, delete, select none & delete original template layer.
6
Just add your drop shadow to this layer.
Time to add the elements,
I have used the following:
Element8 resize to 38 percent, copy & paste to the center of your circle layer.
Element43 resize to 22 percent, copy & paste to the right side of your tag. Duplicate & mirror. Paste once more on the left side of your tag then duplicate & mirror. See my tag for details.
Element17 resize to 26 percent, copy & paste to the left side of your tag. Duplicate & mirror then move it over slightly to the right so that it is sitting nicely on the dark grey leaves.
Resize your tube to your liking and copy & paste to the center of your tag.
Element40 resize to 16 percent-flip, copy & paste to the right side of your tag Duplicate & mirror
Element44 resize to 20 percent, copy & paste to the left side of your tag. Duplicate & mirror then move it over slightly to the right so that it is sitting nicely on the flowers element.
See my tag for details.
Add more elements if you wish to.
Merge your tag visible and move it to where it is sitting nicely in the center of your work space and then add Element7 resize to 60 percent, copy & paste to the left side of your tag. Now send it to the bottom of your layers palette, duplicate & mirror.
Open new raster layer and send to the bottom, copy & paste paper6 and apply your mask.
When your happy with your tag merge all layers and resize to your liking.
Apply the correct artist copyright and license info and save as a PNG, then add your name and merge & save.
I hope you enjoyed this tut. ♥

Monday, December 22, 2014
Festive Frolics - PTU

*Click tag to see full size*
This tutorial is from my own imagination,
any similarity to any other tag or tutorial is purely coincidental.
It was written by LadyAries on December 22nd, 2014.
This tut was written for those with a basic knowledge of psp.
*Supplies Needed*
PSP: I am using X2 but any version should work.
Font of choice: I am using Dickens Carol Cond Bold
Mask: HorsePlay's Pasture Mask9 HERE
*Tube of Choice*
I am using the beautiful art of Alicia Mujica.
And it can be purchased from Alicia Mujica Design.
This is a PTU tube and you must have a license to use.
*Scrap kit Of Choice*
I am using the fantastic PTU kit "Festive Frolics" by Devilish Dezines.
And it can be purchased from The PSP Project.
~ ~ ~ ~ ~ ~ ~ ~ ~ ~
*Let's Get Started*
*Remember to add your drop shadow as you go along*
I am using V3 H3 O25 B5 black
Open a new image 650 x 650
Frame2 resize 72 percent, copy & paste to the center of your tag.
Element43 resize 54 percent, copy & paste to the left side of your tag. Duplicate & mirror.
Element31 resize 40 percent, copy & paste to the left side of your tag. Move to just below element 43 in your layers palette then duplicate & mirror.
Element3 resize 74 percent, copy & paste to the bottom of your tag.
Element10 resize 20 percent, copy & paste to the right side of your tag. Duplicate & mirror.
Element6 resize 38 percent, copy & paste to the right side of your tag. Duplicate & mirror.
Resize your tube to your liking, I have resized mine 50 percent, copy & paste to the center of your frame, Move it to just above your frame in your layers palette. Use your eraser tool to remove all excess parts of your tube that is showing.
Activate your magic wand and click inside your frame layer, Selections modify expand by 14.
Open a new raster layer and flood fill with a color of choice from your tube, I have used #ad1d16, Selections, select none now move down to just below your frame in your layers palette. Effects, Texture effects, Blinds with these settings.

See my tag for details.
Add more elements if you wish to.
Open new raster layer and send to the bottom, copy & paste paper4 and apply your mask & merge group. Duplicate & mirror then merge the two mask layers.
When you are happy with your tag merge all layers and resize to your liking.
Apply the correct artist copyright and license info and save as a PNG, then add your name and merge & save.
I hope you enjoyed this tut. ♥
Sunday, December 7, 2014
Mrs.Claus - PTU

*Click tag to see full size*
This tutorial is from my own imagination,
any similarity to any other tag or tutorial is purely coincidental.
It was written by LadyAries on December 7th, 2014.
This tut was written for those with a basic knowledge of psp.
*Supplies Needed*
PSP: I am using X2 but any version should work.
Font of choice: I am using Contribute_FREE-version
Mask: sg_Christmas4 ~ Link unknown at this time.
*Tube of Choice*
I am using the beautiful art of Disco_Science.
And it can be purchased from Pics For Design.
This is a PTU tube and you must have a license to use.
*Scrap kit Of Choice*
I am using the beautiful kit "Merry Christmas" by Devilish Dezines.
This kit is a part of the Merry Christmas Collab from Scraps N Company.
It is a free gift once you have purchased the required amount.
Inner Bevel on the name with these settings:

~ ~ ~ ~ ~ ~ ~ ~ ~ ~
*Let's Get Started*
*Remember to add your drop shadow as you go along*
I am using V3 H3 O25 B5 black
Open a new image 650 x 650
Frame1 resize 74 percent, copy & paste to the center of your tag.
Element28 resize 76 percent, copy & paste to the center of your tag. Drag this down towards the bottom of your frame. Duplicate, flip & mirror. Now use your eraser tool to move any excess parts that may be showing around the outside of your frame.
Element29 resize 55 percent, copy & paste to the left side of your tag. Send to just below your frame layer. Now use your eraser tool and remove any excess parts from the top that may be showing. Duplicate & mirror.
Element7 resize 50 percent, copy & paste to the right side of your tag. Duplicate & mirror.
Element11 resize 36 percent, copy & paste to the left side of your tag. Duplicate & mirror.
Element11 resize 32 percent-flip, copy & paste to the left side of your tag. Duplicate & mirror.
Element12 resize 24 percent, copy & paste to the right side of your tag. Duplicate & mirror. Adjust, Sharpness, Sharpen one time.
Element16 resize 20 percent, copy & paste to the right side of your tag. Duplicate & mirror. Adjust, Sharpness, Sharpen one time.
Element15 resize 26 percent, copy & paste to the bottom center of your tag.
Activate your magic wand and click inside your frame layer, Selections modify expand by 10.
Open a new raster layer and copy & paste paper1, Selections, invert and then click delete. Over in your layers palette send this layer to the bottom.
Resize tube 65 percent, Activate your magic wand and click inside your frame layer, Selections modify expand by 10. Open a new raster layer and copy & paste your tube, Selections, invert and then click delete. Over in your layers palette move tube to just below your frame.
See my tag for details.
Add more elements if you wish to.
Open new raster layer and send to the bottom, copy & paste paper1 and apply your mask.
When you are happy with your tag merge all layers and resize to your liking.
Apply the correct artist copyright and license info and save as a PNG, then add your name and merge & save.
I hope you enjoyed this tut. ♥
Tuesday, December 2, 2014
Christmas Wishes - PTU

*Click tag to see full size*
This tutorial is from my own imagination,
any similarity to any other tag or tutorial is purely coincidental.
It was written by LadyAries on December 2nd, 2014.
This tut was written for those with a basic knowledge of psp.
*Supplies Needed*
PSP: I am using X2 but any version should work.
Font of choice: I am using PWHandscript
Mask: AR315_104 HERE
*Tube of Choice*
I am using the beautiful art of Ismael Rac.
And it can be purchased from Xeracx
This is a PTU tube and you must have a license to use.
*Scrap kit Of Choice*
I am using the beautiful PTU kit "Ellen's Xmas" by Devilish Dezines.
And it can be purchased from Scraps N Company
*PlugIns*
Eye Candy 6, Gradient glow for the name.
Inner Bevel to my name with settings of:

~ ~ ~ ~ ~ ~ ~ ~ ~ ~
*Let's Get Started*
*Remember to add your drop shadow as you go along*
I am using V3 H3 O25 B5 black
Open a new image 650 x 650
Frame4 resize 74 percent, copy & paste to the center of your tag.
Element32 resize 64 percent, copy & paste to the left side of your tag.
Element14 resize 34 percent-flip, copy & paste to the right side of your tag. Duplicate & mirror.
Element43 resize 26 percent, copy & paste to the left side of your tag. Duplicate & mirror.
Element2 resize 30 percent, copy & paste to the left side of your tag. Duplicate & mirror.
Element35 resize 22 percent, copy & paste to the top left side of your tag. Duplicate & mirror.
Element15 resize 22 percent, copy & paste to the left side of your tag. Duplicate & mirror.
Element17 resize 24 percent, copy & paste to the bottom center of your tag.
Resize tube to your liking, I am using the close up version of this tube. Now copy & paste under your frame layer in your layers palette. Use your eraser tool to remove any excess parts of your tube that may be showing. Duplicate your tube and then in the layers palette bright it up above your frame.
See my tag for details.
Add more elements if you wish to.
Open new raster layer and send to the bottom, copy & paste paper5 and apply your mask. Duplicate & flip.
When you are happy with your tag merge all layers and resize to your liking.
Apply the correct artist copyright and license info and save as a PNG, then add your name and merge & save.
I hope you enjoyed this tut. ♥
Sunday, November 30, 2014
Ice Queen - PTU

*Click tag to see full size*
This tutorial is from my own imagination,
any similarity to any other tag or tutorial is purely coincidental.
It was written by LadyAries on November 30th, 2014.
This tut was written for those with a basic knowledge of psp.
*Supplies Needed*
PSP: I am using X2 but any version should work.
Font of choice: I am using Written on His Hands
Mask: DBV Xmas Mask 06 HERE
*Tube of Choice*
I am using the beautiful art of Tony Tzanoukakis.
And it can be purchased from The Art Of Tony Tzanoukakis.
This is a PTU tube and you must have a license to use.
*Scrap kit Of Choice*
I am using the beautiful PTU kit "Ice Fairy" by Devilish Dezines.
And it can be purchased from Scraps N Company
*PlugIns*
Eye Candy 6, Gradient glow for the name.
Inner Bevel on the name with these settings:

~ ~ ~ ~ ~ ~ ~ ~ ~ ~
*Let's Get Started*
*Remember to add your drop shadow as you go along*
I am using V3 H3 O25 B5 black
Open a new image 650 x 650
Frame4 resize 75 percent, copy & paste to the center of your tag.
Element1 resize 50 percent-flip, copy & paste to the left side of your tag. Duplicate and bring this copy back to the left side also, placing just below the first one.
Element17 resize 50 percent, Image, free rotate right 90 degrees, copy & paste to the left side of your tag.
Element19 resize 40 percent, copy & paste to the left side of your tag.
Element12 resize 28 percent, copy & paste to the left side of your tag.
Element9 resize 18 percent, copy & paste to the left side of your tag. Duplicate and bring this copy back to the left side also, placing just above the first one on the inside of the frame. See my tag for details.
Element38 resize 34 percent, copy & paste to the left side of your tag.
Element38 resize 30 percent-mirror, copy & paste to the left side of your tag.
Element37 resize 90 percent, copy & paste to the left side of your tag. Send this down to just under your frame layer in your layers palette.
Element25 resize 78 percent-mirror, copy & paste to the left side of your tag. Send this down to just under your frame layer in your layers palette.
Element14 resize 20 percent-mirror, copy & paste to the left side of your tag.
Element resize percent, copy & paste to the side of your tag.
Resize tube 64 percent, Activate your magic wand and click inside your frame layer, Selections modify expand by 8. Open a new raster layer and copy & paste your tube, Selections, invert and then click delete. Over in your layers palette move tube to just below your frame.
See my tag for details.
Add more elements if you wish to.
Open new raster layer and send to the bottom, copy & paste paper4 and apply your mask.
When you are happy with your tag merge all layers and resize to your liking.
Apply the correct artist copyright and license info and save as a PNG, then add your name and merge & save.
I hope you enjoyed this tut. ♥
Friday, November 28, 2014
Buy My Store Sale!

Devilish Dezines has a fantastic sale going on until the end of December.
Buy her store... that is all of her kits including all new kits up till that date for $20.00
This is such a great deal! Her kit's are fantastic. You can find this sale at
Tuesday, November 25, 2014
Longing For You - PTU

*Click tag to see full size*
This tutorial is from my own imagination,
any similarity to any other tag or tutorial is purely coincidental.
This tutorial was written by LadyAries on November 25th, 2014.
This tut was written for those with a basic knowledge of psp.
*Supplies Needed*
PSP: I am using X2 but any version should work.
Font of choice: I am using AmazoneBT
Mask: HorsePlay's Pasture Mask27 HERE
Template: Millie's PSP Madness 205 HERE
*Tube of Choice*
I am using the beautiful art of Keith Garvey.
And it can be purchased from Garv Girls Psp Tubes.
This is a PTU tube and you must have a license to use.
*Scrap kit Of Choice*
I am using the beautiful kit "Anniversary" by Devilish Dezines.
This kit is a part of the Anniversary Collab 1 from Scraps N Company.
It is a free gift once you have purchased the required amount.
*PlugIns*
Eye Candy 6, Gradient glow for the name.
~ ~ ~ ~ ~ ~ ~ ~ ~ ~
*Let's Get Started*
*Remember to add your drop shadow as you go along*
I am using V3 H3 O25 B5 black
Open template, Shift D to duplicate then close original & delete credits.
Resize Canvas size to 650 by 650, this will give you a little more room to work with.
1
Select
all/float/defloat new raster layer. Open paper3 copy & paste into selection move it around till you have it where
you want it, selection invert, delete, select none & delete original
template layer.
2
Repeat steps above with the same paper.
3
Select all/float/defloat new raster layer open paper1 copy & paste into selection, selection invert, delete, select none & delete original template layer.
4
Select all/float/defloat new raster layer open paper1 resize 80 percent, copy & paste into selection, selection invert, delete, select none & delete original template layer.
5
Select all/float/defloat new raster layer open paper3 copy & paste into selection, selection invert, delete, select none & delete original template layer.
6 & 7
All I did was add my drop shadow to these two layers.
8 & 9
Delete these two layers from your layers palette.
Time to add the elements, I used the following:
Element14 resize to 50 percent, copy & paste to the top left side of your tag.
Element15 resize to 32 percent, copy & paste to the right side of your tag. Duplicate & mirror.
Element23 resize to 78 percent-mirror, copy & paste to the left side of your tag. Move this layer down under your word art layers in your layers palette. Duplicate & mirror.
Element8 resize to 46 percent, copy & paste to the right side of your tag. Move this layer down under your word art layers in your layers palette. Duplicate & mirror.
Element21 resize to 30 percent, copy & paste to the right side of your tag. Move this layer down under your word art layers in your layers palette. Duplicate & mirror.
Element24 resize to 46 percent, copy & paste to the right side of your tag. Move this layer down under your word art layers in your layers palette. Duplicate & mirror.
Element22 resize to 30 percent, copy & paste to the left side of your tag.
Resize your tube to your liking and copy & paste to the center of your tag.
See my tag for details.
Add more elements if you wish to.
Open
new raster layer and send to the bottom, flood fill with color of
choice or paper3 and apply your mask. Merge group & duplicate your mask layer.
When your happy with your tag merge all layers and resize to your liking.
Apply the correct artist copyright and license info and save as a PNG, then add your name and merge & save.
I hope you enjoyed this tut.♥
Subscribe to:
Posts
(Atom)
Copyright Compliant Award

♥Blogs I Love


♥Stores I Love


