Blinkies


Email Me
ladyaries_67@yahoo.com


Creative Teams
♥Proud Personal CT♥


Forums


I Support...

Showing posts with label Alex Prihodko. Show all posts
Showing posts with label Alex Prihodko. Show all posts
Thursday, February 12, 2015
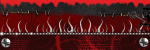
Fire Queen - PTU


*Click tag to view full size*
This tutorial is from my own imagination,
any similarity to any other tag or tutorial is purely coincidental.
It was written by LadyAries on February 12th, 2015.
This tut was written for those with a basic knowledge of psp.
*Supplies Needed*
PSP: I am using X2 but any version should work.
Font of choice: I am using A&S Signwriter
PlugIns: Eye Candy 6, Gradient glow for the name.
*Scrap kit Of Choice*
I am using the fantastic PTU kit "Butterfly Fire" by Devilish Dezines.
And it can be purchased from Scraps N Company
*Tube of Choice*
I am using the beautiful art of Alex Prihodko.
And it can be purchased from Pics For Design.
This is a PTU tube and you must have a license to use.
~ ~ ~ ~ ~ ~ ~ ~ ~ ~
*Let's Get Started*
*Remember to add your drop shadow as you go along*
I am using V3 H3 O25 B5 black
Open a new image 851 x 315 for banner.
Copy & paste paper2 into your tag.
Element8 resize 80 percent-mirror, copy & paste to the left side of your tag.
Element10 resize 80 percent, copy & paste to the left side of your tag.
Resize tube 70 percent-mirror, copy & paste to the center of your tag.
Element3 copy & paste to the right side of your tag.
Element6 copy & paste to the bottom center of your tag.
Element3 - mirror, copy & paste to the left side of your tag.
See my tag for details.
Add more elements if you wish to.
Merge visible, Selections, Select All, Modify, Select Selections Borders with these settings

Now over in your layers palette set your foreground to #521515 and your background to #c06262 and set up your gradient with these settings.

Do not deselect yet. Now flood fill your border with your gradient. Click on Adjust, Add/remove noise, Add noise with these settings.

Selections, select none.
Apply the correct artist copyright and license info and save as a PNG, then add your name and merge & save.
(NOTE: FB does not allow URL's on banners - so only add copyright and license info)
***
Now for the avatar.
Open a new image 180 x 180
Copy & paste the banner into your tag, slide it around so that the bottom left corner is showing.
Merge visible and repeat steps from above for your boarder, gradient & noise.
If you add the tube be sure to apply the correct artist copyright and license info and save as a PNG.
Now add your name and merge & save.
See my tag for details.
Add more elements if you wish to.
When you are happy with your tag merge all layers.
I hope you enjoyed this tut. ♥


Friday, November 7, 2014
CT Tag Show Off ~ Rieneke Designs
Here are my CT tags that I made for Rieneke & Joy with their gorgeous bundle kit
"Ice Cold". These kits are just packed full of fantastic beautiful elements and I just love the colors. It can be purchased from Twilight Scraps. And I
have used artwork of Ismael Rac. You can purchase his art from his store XeracX . I've also used artwork of Alex Prihodko and it can be purchased from Pics For Design. You must have a license to use.
*click on image to view full size*
*click on image to view full size*


And this one is from Joy's part of the bundle.


Tuesday, October 21, 2014
CT Tag Show Off & Snags ~ Rieneke Designs
CT tag that I made for Rieneke with her stunning kit
"Embracing Autumn". It can be purchased from Twilight Scraps. This is a must have kit for any tagger that loves to create Autumn tags. I love the colors and all the beautiful elements in this kit, there is just so much that can be done with it. I
have used artwork of Alex Prihodko. You can purchase this art from Pics For Design. You must have a license to use.
*click on image to view full size*
*click on image to view full size*


*click on image to view full size & right click to save*
Enjoy ♥


Wednesday, October 1, 2014
Beware of the Witch - PTU

This tutorial is from my own imagination,
any similarity to any other tag or tutorial is purely coincidental.
It was written by LadyAries on October 1st, 2014.
This tut was written for those with a basic knowledge of psp.
*Supplies Needed*
PSP: I am using X2 but any version should work.
Font of choice: I am using Bloodyslime
Mask: Gemsmasks190 HERE
*Tube of Choice*
I am using the beautiful art of Alex_Prihodko.
And it can be purchased from Pics For Design.
This is a PTU tube and you must have a license to use.
*Scrap kit Of Choice*
I am using the fantastic PTU kit "Hallowitch" by Devilish Dezines.
And it can be purchased from Scraps N Company.
*PlugIns*
*Scrap kit Of Choice*
I am using the fantastic PTU kit "Hallowitch" by Devilish Dezines.
And it can be purchased from Scraps N Company.
*PlugIns*
Eye Candy 6, Gradient glow for the name.
~ ~ ~ ~ ~ ~ ~ ~ ~ ~
*Let's Get Started*
*Remember to add your drop shadow as you go along*
I am using V3 H3 O25 B5 black
Open a new image 650 x 650
Frame4 resize 75 percent, copy & paste to the center of your tag. Activate your magic wand and click inside your frame layer, Selections modify expand by 10. Open a new raster layer and copy & paste element3, Drag this element up slightly so that the top of it is just above the marching ants. Selections, invert and then click delete. Over in your layers palette drag this layer under your frame and then duplicate & flip. Then move the original on top of the copy in your layers palette.
Element23 resize 78 percent-mirror, copy & paste to the center of your tag. Use your eraser tool to remove any parts that may be sticking out.
Element24 resize 80 percent. Activate your magic wand and click inside your frame layer, Selections modify expand by 10. Open a new raster layer copy & paste your element24 to the left side of your tag. Selections, invert and then click delete.
Element50 resize 60 percent, copy & paste to the left side of your tag. Adjust, Sharpness, sharpen one time.
Element37 resize 20 percent, copy & paste to the left side of your tag. Duplicate, mirror and move the copy to the top right side of your tag.
Element10 resize 30 percent, copy & paste to the left side of your tag.
Element34 resize 50 percent, copy & paste to the right side of your tag.Duplicate, mirror. Apply this element once more and move it to the bottom center of your frame.
Element26 resize 30 percent, copy & paste to the left side of your tag.
Element33 resize 45 percent, copy & paste to the right side of your tag. Duplicate, mirror.
Element49 resize 18 percent, copy & paste to the left side of your tag.
Element25 resize 8 percent, copy & paste to the left side of your tag. Duplicate, mirror & drag copy back to left side of tag.
Element9 resize 25 percent, copy & paste to the bottom of your tag.
Resize your tube 35 percent, copy & paste to the right side of your tag.
See my tag for details.
Add more elements if you wish to.
Open new raster layer and send to the bottom, flood fill with #622901 and apply your mask & then merge group. Duplicate, mirror.
Open new raster layer and send to the bottom, flood fill with #622901 and apply your mask & then merge group. Duplicate, mirror.
When you are happy with your tag merge all layers and resize to your liking.
Apply the correct artist copyright and license info and save as a PNG, then add your name and merge & save.
I hope you enjoyed this tut.♥
~ ~ ~ ~ ~ ~ ~ ~ ~ ~ ~ ~
Thank you so very much for trying my tut Vickie.
Your tag is gorgeous!! I love it!♥

I hope you enjoyed this tut.♥
~ ~ ~ ~ ~ ~ ~ ~ ~ ~ ~ ~
Thank you so very much for trying my tut Vickie.
Your tag is gorgeous!! I love it!♥
Wednesday, July 16, 2014
1000 Sighs - PTU

*Click tag to see full size*
This tutorial is from my own imagination,
any similarity to any other tag or tutorial is purely coincidental.
It was written by LadyAries on July 16th, 2014.
This tut was written for those with a basic knowledge of psp.
*Supplies Needed*
PSP: I am using X2 but any version should work.
Font of choice: I am using Pristina
Mask: HorsePlay's Pasture Mask9 HERE
Drop Shadow usually V3 H3 O25 B5 black
*Tube of Choice*
I am using the beautiful art of Alex Prihodko.
And it can be purchased from Pics For Design.
This is a PTU tube and you must have a license to use.
*Scrap kit Of Choice*
I am using the beautiful PTU kit "1000 Sighs" by Devilish Dezines.
And it can be purchased from Pics For Design.
*Scrap kit Of Choice*
I am using the beautiful PTU kit "1000 Sighs" by Devilish Dezines.
And it can be purchased from Pics For Design.
*PlugIns*
Eye Candy 6, Gradient glow for the name.
~ ~ ~ ~ ~ ~ ~ ~ ~ ~
*Let's Get Started*
*Remember to add your drop shadow as you go along*
Open a new image 650 x 650
Element41 resize 75 percent, copy & paste to the center of your tag.
Element31 resize 72 percent, copy & paste to the bottom of your tag. Over in your layers palette drag this layer under your first layer. Now activate your eraser tool and erase all the extra parts that are showing.
Element45 resize 38 percent - mirror, copy & paste to the left side of your tag. Duplicate & adjust the two to your liking.
Element45 resize 38 percent - mirror, copy & paste to the left side of your tag. Duplicate & adjust the two to your liking.
Element30 resize 60 percent, copy & paste to the left side of your
tag. Duplicate, mirror & adjust the two to your liking.
Element47 mirror, copy & paste to the left side of your tag. Activate your eraser tool and erase the extra parts of this element from along the bottom of your tag.
Element47 resize 78 percent, copy & paste to the left side of your tag. Activate your eraser tool and erase the extra parts of this element from along the bottom of your tag.
Element40 resize 56 percent, copy & paste to the left side of your tag.
Element42 resize 18 percent, copy & paste to the left side of your tag.
Element1 resize 30 percent, flip, mirror and copy & paste to the left side of your tag.
Element6 resize 23 percent, copy & paste to the left side of your tag.
Activate your magic wand and click inside your frame layer, Selections modify expand by 6.
Open a new raster layer and copy & paste paper6, Selections, invert and then click delete.
Over in your layers palette drag this layer under your frame and flower layers.
Activate your magic wand and click inside your frame layer, Selections modify expand by 6.
Open a new raster layer and copy & paste your tube, Selections, invert and then click delete.
Over in your layers palette drag this layer under your frame and flower layers. Now click on Blend mode and change to luminance legacy.
See my tag for details.
Add more elements if you wish to.
Open new raster layer and drag to the bottom, copy & paste paper6 and apply your mask.
When you are happy with your tag merge all layers and resize to your liking.
Apply the correct artist copyright and license info and save as a PNG, then add your name and merge & save.
I hope you enjoyed this tut.♥
Saturday, November 9, 2013
Midnight Shades - PTU

This tutorial is from my own imagination,
any similarity to any other tag or tutorial is purely coincidental.
It was written by LadyAries on November 9th, 2013.
This tut was written for those with a basic knowledge of psp.
*Supplies Needed*
PSP: I am using X2 but any of them should work.
Font of choice, I am using Calligra Phillip
Mask: WSL 84 HERE
Drop Shadow usually V3 H3 O25 B5 black
*Tube of Choice*
I am using the beautiful art of Alex Prihodko.
And it can be purchased HERE
And it can be purchased HERE
This is a PTU tube and you must have a license to use.
*Scrap kit Of Choice*
I am using the fantastic PTU kit "Alchemy" by DevilishDezines.
~ ~ ~ ~ ~ ~ ~ ~ ~ ~
*Let's Get Started*
*Remember to add your drop shadow as you go along*
Open a new image 650 x 650
Element10 resize 80 percent, copy & paste to the center of your tag.
Element10 resize 80 percent, copy & paste to the center of your tag.
Element3 re size 40 percent, copy & paste to the right side of your tag.
Element7 resize 77 percent, copy & paste to the center of your tag.
Element18 resize 40 percent, copy & paste to the left side of your tag.
Element43 resize 30 percent & rotate 30 degrees left, copy & paste to the left side of your tag.
Element2 resize 20 percent, copy & paste to the left side of your tag.
Resize your tube 40 percent, copy & paste to the center of your tag.
Element11 resize 40 percent, copy & paste to the left side of your tag.
See my tag for details.
Add more elements if you wish to.
Open new raster layer and send to the bottom, flood fill with color of choice I used #121c5c and apply your mask. Duplicate & mirror then merge down, duplicate & flip.
Open new raster layer and send to the bottom, flood fill with color of choice I used #121c5c and apply your mask. Duplicate & mirror then merge down, duplicate & flip.
When you are happy with your tag merge all layers and resize to your liking.
Apply the correct artist copyright and license info and save as a PNG, then add your name and merge.
I hope you enjoyed this tut. ♥
Apply the correct artist copyright and license info and save as a PNG, then add your name and merge.
I hope you enjoyed this tut. ♥
~ ~ ~ ~ ~ ~ ~ ~ ~ ~ ~ ~
My dear sweet friend Jori from ACDiva forum has tried my tut. Yay
This is her beautiful tag set she made. Thanks so very much Jori!! ♥


Sunday, November 3, 2013
Tag Show Off
I made this tag set last night with beautiful artwork of Alex Prihodko which can be purchased from Pics For Design. The scrap kit I used is a PTU kit by Rieneke Designs & Joy Designs, "I'm Snow Excited" which can be purchased from Twilight Scraps. This kit is just beautiful!
*click on image to view full size*


Wednesday, October 2, 2013
CT Tag Show Off
Here are my CT tags that I made for Sassi with this fantastic kit
"PreciousFriends".
This kit is huge!! There is so much that can be done with it. See a listing of her stores HERE. And I used artwork of Alex Prihodko & VeryMany. You can purchase their art from Pics For Design. You must have a license to use this art.
*click on image to view full size*


Friday, August 2, 2013
CT Tag Show Off
This is my first tag using Sassi Designs "Fairy Fun" scrap kit which you can purchase from any of her stores, see a listing of them HERE.
And I used artwork of Alex Prihodko which can be purchased from Pics For Design. You must have a license to use this beautiful art.

Tuesday, July 16, 2013
Summer Days Snags
I made this snag set with artwork of Alex Prihodko which can be purchased from Pics For Design. The scrap kit I used is a PTU kit by
AmyMarie, Elodie Orange Cream which can be purchased from her store Amy Maries Kits.
*click on image to view full size & right click to save*
Enjoy ♥ 


Wednesday, July 3, 2013
Tag Show Off...
I made this lovely tag with artwork of Alex Prihodko which can be purchased from Pics For Design and a cluster frame from Designz by Celesta. Once I had the tag made I thought hmm why not try making a forum set out of it. The scrap kit I used to finish this off was a PTU kit by AmyMarie, SeaLife which can be purchased from Amy Maries Kits.
*click on image to view full size*


Subscribe to:
Posts
(Atom)
Copyright Compliant Award

♥Blogs I Love


♥Stores I Love